• Skip to primary navigation
  • Skip to main content
  • Skip to primary sidebar

The Home Inspection Service

Quality Home Inspections for Good Value

  • Home
  • About Us
  • Services
  • Blog
  • Contact Us
  • Qualifications
  • Home Inspection Agreement
  • FAQ’s
    • Consumer Information

Water Heaters

June 7, 2020 by Mark Brickhouse

This article provides a brief overview of the safety components of a water heater and some of the latest trends in water heaters. Many deficiencies related to water heaters are also safety issues. While performing home inspections in Waco, I will often find deficiencies with water heaters.

Gas Water Heaters:

waco home inspections
While performing home inspections, I will often find a lack of adequate flue clearance to combustibles.

Since gas water heaters burn gas, they have the potential to produce carbon monoxide. Modern standards require a gas heater to draw combustion air from an outside source, such as the attic or crawl space, or from outside. Combustion air that is required is based on the BTU's of the unit. Manufacturer's recommendations should be followed, and will vary based on the manufacturer, size and output of the water heater. When outside combustion air is provided, the water heater should be sealed from the living quarters, usually with a solid door and threshold. While this is a code requirement now, many houses that were built in the past had louvred or vented doors that provided combustion air from the living space. If outside combustion air is not provided, the room where air is drawn from should be large enough to provide the air, and a carbon monoxide alarm should be present. People lose their lives every year because they were poisoned by carbon monoxide, when an alarm would likely have saved their lives.

Gas connections should be tight and not leaking. If a leak is detected or if there is a smell of gas, this should be addressed immediately by a licensed plumber. Gas explosions can and do occur, and can cause extensive damage, as well as serious injury and death.

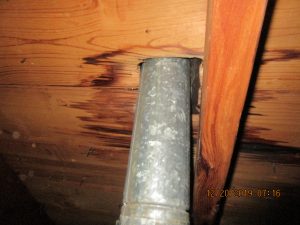
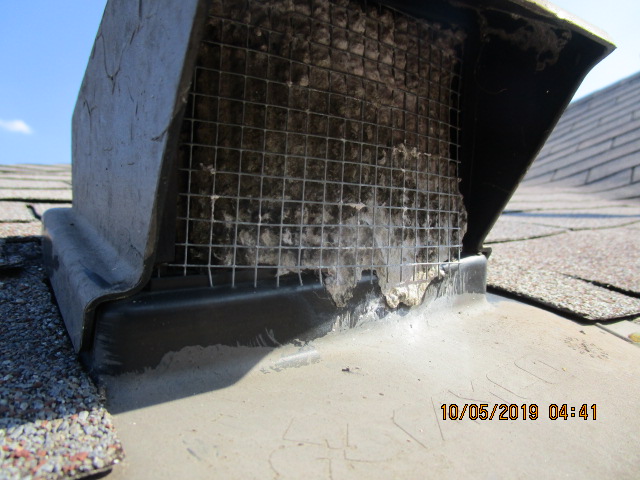
Gas water heaters should have proper exhaust ventilation, which includes a type B vent that exhausts straight up, preferably. Specific manufacturer's recommendations should be followed. While inspecting this item, your home inspector can be expected to verify that the flue is a Type B or double walled. Even with this type of flue, it should be at least an inch clear of any combustible material and should have a heat ring where it goes through the ceiling. There should also be a Type B cap at the top where it ends above the roof. All connections should be tight and should have three screws, although this is rare based on my experience.

Location Matters:

home inspection in waco
Water heaters should be 18 inches above floor level when located in a garage.

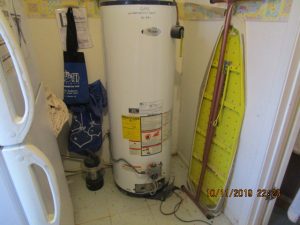
If a water heater is located in a garage, it should be at least 18 inches above the floor. This is to prevent gas or solvent fumes from igniting and causing a fire or explosion. Many newer water heaters now have FVIR, or flame vapor ignition resistant systems; while FVIR may allow for putting a water heater on a garage floor, I prefer to err on the side of caution and will recommend a platform when inspecting a house for this condition, because the FVIR could fail. Water heaters located in a garage should also be protected from possible damage by cars, either by location or with physical barriers, such as a framed closet.


Standard Safety Features:

One safety feature on all standard water heaters, and perhaps the most important, is the TPR valve, or Temperature/Pressure Release. This will discharge if the temperature becomes too hot or the pressure is too high. If it works under these circumstances, it will release scalding steam. Therefore, the extension should end in a reasonably safe location. If it is not working as intended when there is too much heat or pressure, it can cause damage, injury or death. If anyone has seen the Myth Busters episode on what happens when a water heater malfunctions either with temperature or pressure, then it has been firmly established there is a great potential for danger. Here is a link to that episode on You Tube in case you missed it: https://www.youtube.com/watch?v=9bU-I2ZiML0

Home inspection deficiencies
TPR valves can release scalding steam and should be safely extended.

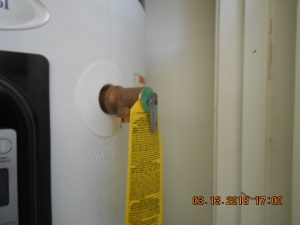
TPR valves can become frozen shut or stuck. The best way to insure that the valve is working correctly is to operate it at least once a year. This should be done by a licensed plumber, since these valves may develop a leak when "exercised" or there may be some other reason for it to be replaced, such as corrosion.  TPR valves in older homes should be extended to within 6 inches of the floor with material rated for the heat and pressure, and should be the same size as the valve, typically 3/4 inches; the extension should never be capped, and it should not have threads that will allow capping. Sometimes PEX is used for an extension. While it is a suitable material, it is also flexible, and should be secured so that it will not move under pressure. In homes built in the past ten years, this extension is directed to the exterior, and should terminate to a safe location for discharge.

Electric Water Heaters

The power supply should be armored cable or a similar suitable material, and the equipment should be properly grounded or bonded. There should be an emergency disconnect within 25 feet of the heater. If water supply is iron or metal, there should be a jumping bond between the hot and cold supplies.

While there are other considerations that go with inspecting a water heater, the items listed above cover safety in general.

new home inspection
Many newer homes have on demand water heaters that take less space and are more efficient.

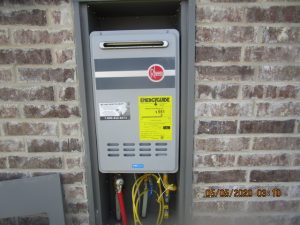
There are two developments with water heaters that are relatively new. First, as of June 2015, water heaters are now required to meet enhanced energy efficiency, which includes more insulation. More insulation means larger heaters, increasing the diameter by about 4 inches. If your heater is in a tight closet, this may be something to consider. Another development that is getting more common is the use of in-line or tank-less water heaters. These are available in both gas and electric models, are very space efficient, and are also more energy efficient. The early versions of these tended to produce less hot water than most people are used to. However, more recent designs have improved a lot, and tank-less water heaters are becoming a more viable alternative. Again, the specific manufacturer's instructions should be carefully followed.


A Little Bit on Dryer Venting

April 8, 2020 by Mark Brickhouse

There are many deficiencies that occur with dryer venting that can reduce dryer efficiency, and can even be a fire or health hazard . This article outlines some of the more common deficiencies.

Venting a Dryer to a Roof:

According to current requirements, a dryer exhaust vent can be 25 feet long; this gets reduced to 20 feet with a ninety degree turn, and floor design may make venting to the roof a practical option for builders; not so much for homeowners, though. There can be problems with venting to roofs. First of all, homeowners have to pay for routine cleaning as a best practice for a safe dryer vent. They certainly should not risk being on a roof, when falls are 25% of homeowner injuries.

While there are roof vent caps that are specifically designed for dryer exhausts, many I have encountered in the last seven years were not. A standard roof vent is often in place, which is screened over. These can become clogged very quickly, reducing dryer efficiency, and can cause leaks or even mold to develop. Other times, roof vents may have their screens removed, but with no closing flap as required, insect or pest problems can develop. In my professional opinion, the best time to vent a dryer to the roof top is only when there is no other option.

Fortunately there are other options. One of the more obvious solutions is installing a vent-less dryer. As you can imagine, these are more expensive than standard dryers. As a consumer, you would have to weigh the added cost compared to the cost of having your vent professionally cleaned on a regular basis. Another option is a dryer duct booster fan, which may not only extend the allowable length of duct (in some cases, up to 150 feet), but may also improve drying time and efficiency. There are several brands that range from $82 to $315. The best time to install one, however, is while a house is under construction, and they do require electricity.

Venting to Improper Locations:

Dryer Venting Into a Garage

If a dryer duct does not go to the exterior, then wherever it goes to is an improper location, whether it is to a garage, an attic or crawlspace. This condition is commonly found in older homes. I recently performed an inspection where the dryer had been venting into the attic for years, leaving heavy deposits of lint there. The homeowner did not even know this! Warm, moist air in the attic can lead to mold or cause structural damage. It can even be a fire hazard.

Speaking of fire hazards, what’s wrong with venting into the garage? For starters, there should not be any kind of vent penetration between the house and garage for fire safety reasons. This will nullify fire separation requirements, and venting into an area where flammable liquids or combustible gasses are present increases fire hazard as well. Even if an occupant dodges that fate, there is still another condition that is guaranteed to develop. Garage drywall, especially on the ceiling, will become damaged. Given enough time, it may simply collapse, no longer held by the fasteners. Even venting to a rooftop is a better option than not venting to the exterior at all.

Improper Vent Materials


Dryer vent material, especially going through concealed spaces like wall cavities, should be smooth metal and should be a minimum 28 gauge thickness. The vent pictured above is made of the wrong material. Although this is available at box stores, vinyl is not considered to be suitable. Even many “metallic” flexible vents are low quality and are not much of an upgrade over vinyl. Flexible vents should be made of thicker material than either of the ones pictured above, and are available. They cost more, but since thousands of fires that are associated with dryers or their vents occur every year, it may be worth a few more dollars.

10 Easy Ways to Save Money and Energy in Your Home

February 27, 2020 by Mark Brickhouse

Saving EnergyCourtesy of InterNACHI
By Nick Gromicko, Ben Gromicko, and Kenton Shepard

Most people don’t know how easy it is to make their homes run on less energy, and here at InterNACHI, we want to change that. Drastic reductions in heating, cooling and electricity costs can be accomplished through very simple changes, most of which homeowners can do themselves. Of course, for homeowners who want to take advantage of the most up-to-date knowledge and systems in home energy efficiency, InterNACHI energy auditors can perform in-depth testing to find the best energy solutions for your particular home.

Why make your home more energy efficient? Here are a few good reasons:

Federal, state, utility and local jurisdictions’ financial incentives, such as tax breaks, are very advantageous for homeowners in most parts of the U.S.

  • It saves money. It costs less to power a home that has been converted to be more energy-efficient.
  • It increases the comfort level indoors.
  • It reduces our impact on climate change. Many scientists now believe that excessive energy consumption contributes significantly to global warming.
  • It reduces pollution. Conventional power production introduces pollutants that find their way into the air, soil and water supplies.

1. Find better ways to heat and cool your house.

As much as half of the energy used in homes goes toward heating and cooling. The following are a few ways that energy bills can be reduced through adjustments to the heating and cooling systems:

  • Install a ceiling fan. Ceiling fans can be used in place of air conditioners, which require a large amount of energy.
  • Periodically replace air filters in air conditioners and heaters.
  • Set thermostats to an appropriate temperature. Specifically, they should be turned down at night and when no one is home. In most homes, about 2% of the heating bill will be saved for each degree that the thermostat is lowered for at least eight hours each day. Turning down the thermostat from 75° F to 70° F, for example, saves about 10% on heating costs.
  • Install a programmable thermostat. A programmable thermostat saves money by allowing heating and cooling appliances to be automatically turned down during times that no one is home and at night. Programmable thermostats contain no mercury and, in some climate zones, can save up to $150 per year in energy costs.
  • Install a wood stove or a pellet stove. These are more efficient sources of heat than furnaces.
  • At night, curtains drawn over windows will better insulate the room.

2. Install a tankless water heater.

Demand-type water heaters (tankless or instantaneous) provide hot water only as it is needed. They don’t produce the standby energy losses associated with traditional storage water heaters, which will save on energy costs. Tankless water heaters heat water directly without the use of a storage tank. When a hot water tap is turned on, cold water travels through a pipe into the unit. A gas burner or an electric element heats the water. As a result, demand water heaters deliver a constant supply of hot water. You don’t need to wait for a storage tank to fill up with enough hot water.

3. Replace incandescent lights.

The average household dedicates 11% of its energy budget to lighting. Traditional incandescent lights convert approximately only 10% of the energy they consume into light, while the rest becomes heat. The use of new lighting technologies, such as light-emitting diodes (LEDs) and compact fluorescent lamps (CFLs), can reduce the energy use required by lighting by 50% to 75%. Advances in lighting controls offer further energy savings by reducing the amount of time that lights are on but not being used. Here are some facts about CFLs and LEDs:

  • CFLs use 75% less energy and last about 10 times longer than traditional incandescent bulbs.
  • LEDs last even longer than CFLs and consume less energy.
  • LEDs have no moving parts and, unlike CFLs, they contain no mercury.

4. Seal and insulate your home.

Sealing and insulating your home is one of the most cost-effective ways to make a home more comfortable and energy-efficient, and you can do it yourself. A tightly sealed home can improve comfort and indoor air quality while reducing utility bills. An InterNACHI energy auditor can assess leakage in the building envelope and recommend fixes that will dramatically increase comfort and energy savings.

The following are some common places where leakage may occur:

  • electrical receptacles/outlets;
  • mail slots;
  • around pipes and wires;
  • wall- or window-mounted air conditioners;
  • attic hatches;
  • fireplace dampers;
  • inadequate weatherstripping around doors;
  • baseboards;
  • window frames; and
  • switch plates.

Because hot air rises, air leaks are most likely to occur in the attic. Homeowners can perform a variety of repairs and maintenance to their attics that save them money on cooling and heating, such as:

  • Plug the large holes. Locations in the attic where leakage is most likely to be the greatest are where walls meet the attic floor, behind and under attic knee walls, and in dropped-ceiling areas.
  • Seal the small holes. You can easily do this by looking for areas where the insulation is darkened. Darkened insulation is a result of dusty interior air being filtered by insulation before leaking through small holes in the building envelope. In cold weather, you may see frosty areas in the insulation caused by warm, moist air condensing and then freezing as it hits the cold attic air. In warmer weather, you’ll find water staining in these same areas. Use expanding foam or caulk to seal the openings around plumbing vent pipes and electrical wires. Cover the areas with insulation after the caulk is dry.
  • Seal up the attic access panel with weatherstripping. You can cut a piece of fiberglass or rigid foamboard insulation in the same size as the attic hatch and glue it to the back of the attic access panel. If you have pull-down attic stairs or an attic door, these should be sealed in a similar manner.

5. Install efficient showerheads and toilets.

The following systems can be installed to conserve water usage in homes:

  • low-flow showerheads. They are available in different flow rates, and some have a pause button which shuts off the water while the bather lathers up;
  • low-flow toilets. Toilets consume 30% to 40% of the total water used in homes, making them the biggest water users. Replacing an older 3.5-gallon toilet with a modern, low-flow 1.6-gallon toilet can reduce usage an average of 2 gallons-per-flush (GPF), saving 12,000 gallons of water per year. Low-flow toilets usually have “1.6 GPF” marked on the bowl behind the seat or inside the tank;
  • vacuum-assist toilets. This type of toilet has a vacuum chamber that uses a siphon action to suck air from the trap beneath the bowl, allowing it to quickly fill with water to clear waste. Vacuum-assist toilets are relatively quiet; and
  • dual-flush toilets. Dual-flush toilets have been used in Europe and Australia for years and are now gaining in popularity in the U.S. Dual-flush toilets let you choose between a 1-gallon (or less) flush for liquid waste, and a 1.6-gallon flush for solid waste. Dual-flush 1.6-GPF toilets reduce water consumption by an additional 30%.
  • 6. Use appliances and electronics responsibly.

Appliances and electronics account for about 20% of household energy bills in a typical U.S. home. The following are tips that will reduce the required energy of electronics and appliances:

  • Refrigerators and freezers should not be located near the stove, dishwasher or heat vents, or exposed to direct sunlight. Exposure to warm areas will force them to use more energy to remain cool.
  • Computers should be shut off when not in use. If unattended computers must be left on, their monitors should be shut off. According to some studies, computers account for approximately 3% of all energy consumption in the United States.
  • Use efficient ENERGY STAR-rated appliances and electronics. These devices, approved by the U.S. Department of Energy and the Environmental Protection Agency’s ENERGY STAR Program, include TVs, home theater systems, DVD players, CD players, receivers, speakers, and more. According to the EPA, if just 10% of homes used energy-efficient appliances, it would reduce carbon emissions by the equivalent of 1.7 million acres of trees.
  • Chargers, such as those used for laptops and cell phones, consume energy when they are plugged in. When they are not connected to electronics, chargers should be unplugged.
  • Laptop computers consume considerably less electricity than desktop computers.

7. Install daylighting as an alternative to electrical lighting.

Daylighting is the practice of using natural light to illuminate the home’s interior. It can be achieved using the following approaches:

  • skylights. It’s important that they be double-pane or they may not be cost-effective. Flashing skylights correctly is key to avoiding leaks;
  • light shelves. Light shelves are passive devices designed to bounce light deep into a building. They may be interior or exterior. Light shelves can introduce light into a space up to 2½ times the distance from the floor to the top of the window, and advanced light shelves may introduce four times that amount;
  • clerestory windows. Clerestory windows are short, wide windows set high on the wall. Protected from the summer sun by the roof overhang, they allow winter sun to shine through for natural lighting and warmth; and
  • light tubes. Light tubes use a special lens designed to amplify low-level light and reduce light intensity from the midday sun. Sunlight is channeled through a tube coated with a highly reflective material, and then enters the living space through a diffuser designed to distribute light evenly.

8. Insulate windows and doors.

About one-third of the home’s total heat loss usually occurs through windows and doors. The following are ways to reduce energy lost through windows and doors:

  • Seal all window edges and cracks with rope caulk. This is the cheapest and simplest option.
  • Windows can be weatherstripped with a special lining that is inserted between the window and the frame. For doors, apply weatherstripping around the whole perimeter to ensure a tight seal when they’re closed. Install quality door sweeps on the bottom of the doors, if they aren’t already in place.
  • Install storm windows at windows with only single panes. A removable glass frame can be installed over an existing window.
  • If existing windows have rotted or damaged wood, cracked glass, missing putty, poorly fitting sashes, or locks that don’t work, they should be repaired or replaced.

9. Cook smart.

An enormous amount of energy is wasted while cooking. The following recommendations and statistics illustrate less wasteful ways of cooking:

  • Convection ovens are more efficient that conventional ovens. They use fans to force hot air to circulate more evenly, thereby allowing food to be cooked at a lower temperature. Convection ovens use approximately 20% less electricity than conventional ovens.
  • Microwave ovens consume approximately 80% less energy than conventional ovens.
  • Pans should be placed on the matching size heating element or flame.
  • Using lids on pots and pans will heat food more quickly than cooking in uncovered pots and pans.
  • Pressure cookers reduce cooking time dramatically.
  • When using conventional ovens, food should be placed on the top rack. The top rack is hotter and will cook food faster.

10. Change the way you do laundry.

  • Do not use the medium setting on your washer. Wait until you have a full load of clothes, as the medium setting saves less than half of the water and energy used for a full load.
  • Avoid using high-temperature settings when clothes are not very soiled. Water that is 140° F uses far more energy than 103° F for the warm-water setting, but 140° F isn’t that much more effective for getting clothes clean.
  • Clean the lint trap every time before you use the dryer. Not only is excess lint a fire hazard, but it will prolong the amount of time required for your clothes to dry.
  • If possible, air-dry your clothes on lines and racks.
  • Spin-dry or wring clothes out before putting them into a dryer.

Homeowners who take the initiative to make these changes usually discover that the energy savings are more than worth the effort. InterNACHI home inspectors can make this process much easier because they can perform a more comprehensive assessment of energy-savings potential than the average homeowner can.

Copyright © 2023 The Home Inspection Service. All rights reserved.

  • Home
  • About Us
  • Services
  • Blog
  • Contact Us
  • Qualifications
  • Home Inspection Agreement
  • FAQ’s